
Our stage makeup class just finished the old age unit. Just in time to apply those lessons to work on the cast of Addams Family the Musical. Grandma needed some work.


Here are the steps we taught the students to create a great old age makeup for the stage.
The first step is RESEARCH. We teach the students to collect pictures that inspire their design for a morgue. We teach them to look for actual faces that reflect the characteristics of the character they are designing.


Grandma Addams is 102 (so it says in the script), a person who love herbs and potions, and a person who loves to live life. I see her a bit like a gypsy or a witch.
Then we teach the students to draw a design or a makeup plate. Grandma’s plate got destroyed so this example will have to do.

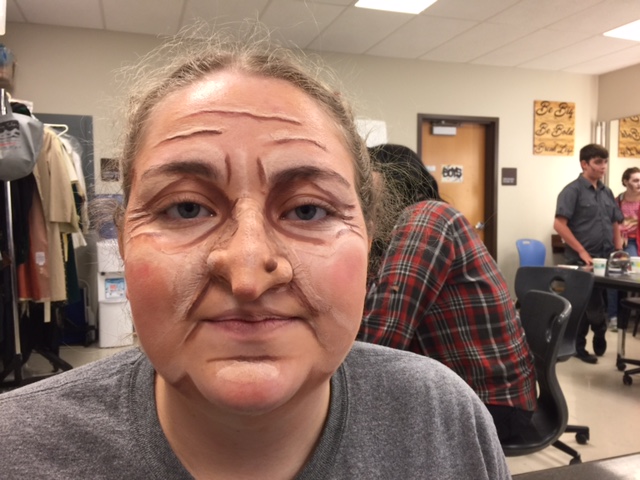
For Grandma Addams’ make up we started be applying the prosthetic nose and some latex.

To apply the nose I put spirit gum on the actor’s face and and the prosthetic nose. I wait a little bit for both spirit gum applications to get a little tacky before sticking the nose on the face. Then I applied latex to blend the edges to the face. I needed to do this step because we used the nose 10 or more times and the edges began to get rather ragged. I also applied latex around the eye, forehead, and chin. This took awhile because you need to stretch the skin during the the application and drying phase. we needed to help the nose blend into her face a bit more and the added latex helped to sag the skin and to give it texture.
Once the latex had dried, we applied an old age Ben Nye base over her entire face.
I usually start at the top of the face and move toward the bottom. I don’t want to risk smudging the makeup as I work.
I start by contouring the forehead. I highlight along the hairline, above the eyebrows and along the side of the forehead. I add a little shadow in the middle of the forehead and at the temples.
Then, I add wrinkles. I usually ask the actor to raise their eyebrows. This gives a good idea where they will eventually, naturally wrinkle for themselves. I then draw a flat line in each wrinkle. I have them let go of their eyebrows and then I darken the line and drag the shadow down a bit, blending it into the makeup. Next, I add highlight just above the shadow line and blend it up. Where the two lines meet, keep it crisp… blend them away from that edge.
Students usual freak out. It does look a little like a bunch of lines on your face. LOL.
Next I have the student bring their eyebrows together and add small frown wrinkles between the eyebrows and on the bridge of the nose. Every shadow needs highlight. Again, where the two edges meet the lines need to be crisp. The blend happens on the opposite side. Hint: the highlight for the “between the brows goes in the center.
I then move to the eyes. I create a shadow, starting from the corner of the eye next to the nose to deepen the eye socket next to the nose. I put shadow to cause the eye lid to sag… about 1/2 in the middle of the eyebrow to the outside corner of the eye. I add highlight to the eye lid and just under the eyebrow.
Next I add bags to the under eye. I start with a little shadow on the lower lid and along the eye socket area. I leave a little space in the middle. I highlight the center of the bag and blend. I add highlight on the cheek side of the bag and blend it into the cheek. The bag shadows should be heavier in the corners. Next I add crows feet. I add the highlight under the lines for crows feet.
Next I move to the cheeks. I start at the nostrils and follow the crease down. I usually need the actor smile so that I can find it on a youthful face. I usually stop just about the corner of the mouth and then add a second line down from the corner of the mouth. I usually blend this line out a little and then add a blended highlight on the cheek. The idea is make the cheek sag and look fuller at these smile lines.I also a highlight on the inside.
I decided to add apple cheeks for Grandma. I blend a little extra shadow for definition and highlight to the middle of the cheekbone and surrounding cheek area. I usually add a little highlight below the shadow as well. Finally, I a add a little blush on the apple of the cheek area.


To help the cheeks apple out, I add highlight in a scallop motion along the jawline. Then I add shadow beneath the scalloped jaw line and blend it into the neck.
Next, I age the lips. I try to keep this simple and just add a couple of wrinkles to the lips.
Finally, I go back over the makeup and do any touch up that may be needed before I powder off. The makeup may not be symmetrical. That is okay. That is normal. It will look dramatic… maybe even, unnatural up close. Trust me. This is best for stage. Remember, your audience is far away!
So that’s it! The making of Grandma Addams.
A HUGE thanks to my friend, John Bruning for taking all the AWESOME pictures for the show that I use in all of my blog posts about the theater things I write about. He always makes me look good!

If you are interested in more posts on teaching high school theater, the making of a high school musical and more, check out some of the posts:
If You Build It They Will Come – Addams Family Set
Building Flexible Ship Stairs for Escape Stairs
Performing Arts Education Matters!

2 thoughts on “Painting Grandma”